
The Flash Sale Countdown extension by Atomic Addons runs timed flash sales in your WooCommerce store. Each campaign has its own discount, products, schedule and optional unit limit; its products show a live countdown and a progress bar, and prices go back to normal when it ends. This guide covers campaigns, the timer settings, the shortcode and the product widgets.
Enable the Flash Sale Countdown Extension
 (Open the full-size image in a new tab)
WooCommerce must be installed and active. Then switch the extension on from the Atomic Addons dashboard:
- 1
Go to WordPress Dashboard → Atomic Addons.
- 2
Under WooCommerce, click Extensions.
- 3
Find the Flash Sale Countdown card and turn its switch On.
- 4
Click Open to open the extension's settings.
Create a Campaign
 (Open the full-size image in a new tab)
- 1
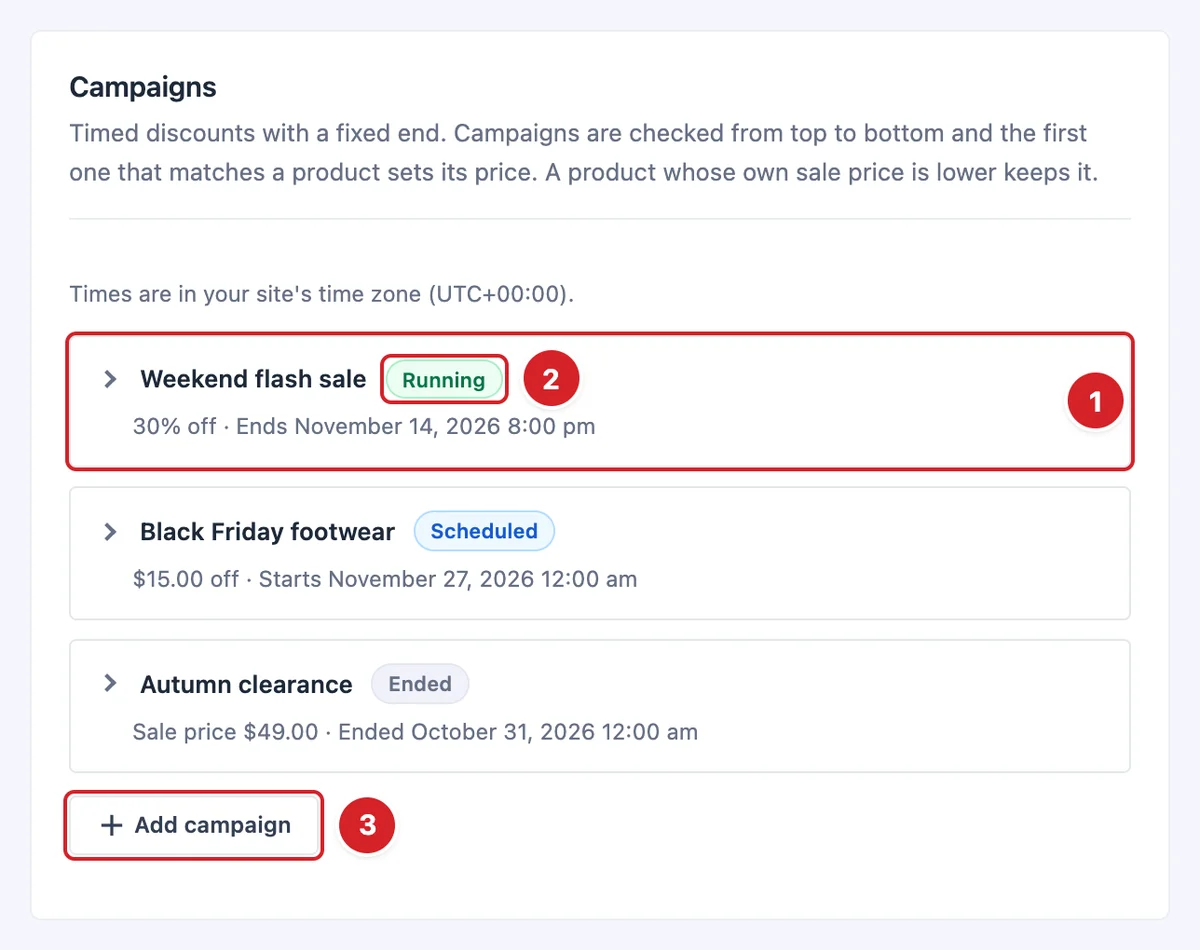
Campaign: The name, discount and start or end time. Click a row to open its fields. Times are in your site's time zone.
- 2
Status: Running, Scheduled, Ended or Off; New until you save.
- 3
Add campaign: Adds a new campaign at the bottom of the list.
Campaigns are checked from top to bottom, and the first running campaign that covers a product sets its price.
 (Open the full-size image in a new tab)
- 1
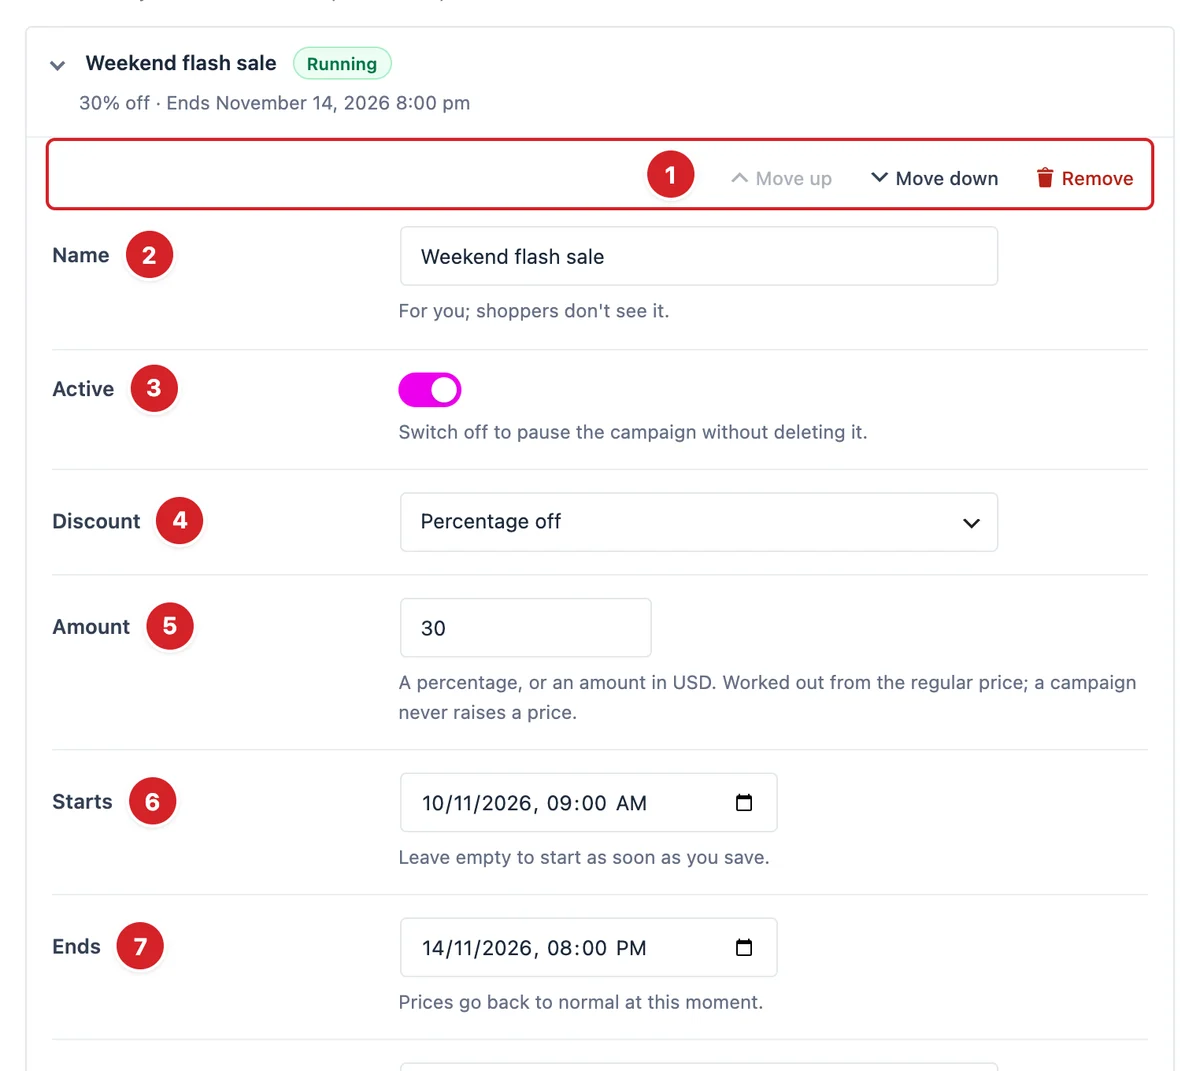
Move up · Move down · Remove: Change the campaign's place in the list, or delete it when you save.
- 2
Name: For you only; shoppers never see it.
- 3
Active: On by default. Switch it off to pause the campaign.
- 4
Discount: Percentage off (default), Fixed amount off or Fixed sale price.
- 5
Amount: A percentage or an amount in your store currency, worked out from the regular price. It never raises a price.
- 6
Starts: Leave it empty to start as soon as you save.
- 7
Ends: Required. Prices go back to normal at this moment.
 (Open the full-size image in a new tab)
- 1
Applies to: All products (default), Product categories (subcategories included) or Specific products.
- 2
Products: A variable product covers all its variations; you can also pick single variations. For categories, this field is Categories.
- 3
Never include: Products left out even when they match.
- 4
Units at the flash price: Units of each product that can sell at the flash price; then the normal price returns. Leave it empty for no limit.
Flash prices show everywhere WooCommerce shows a sale price, including the cart and checkout blocks. Units count as sold in Processing, On hold and Completed orders, and unpaid orders hold theirs for WooCommerce's Hold stock (minutes). The cart refuses quantities above the units left, and the progress bar counts held units the same way, so its “left” number matches what the cart accepts.
A campaign without an amount, without an end date, or ending before it starts is saved switched off, with the reason shown. If a product's own sale price (or a role-based price) is lower, shoppers pay that and the campaign's timer doesn't show. All variations of a variable product share one unit limit. Grouped and external products are never discounted.
Choose Where the Countdown Shows
 (Open the full-size image in a new tab)
- 1
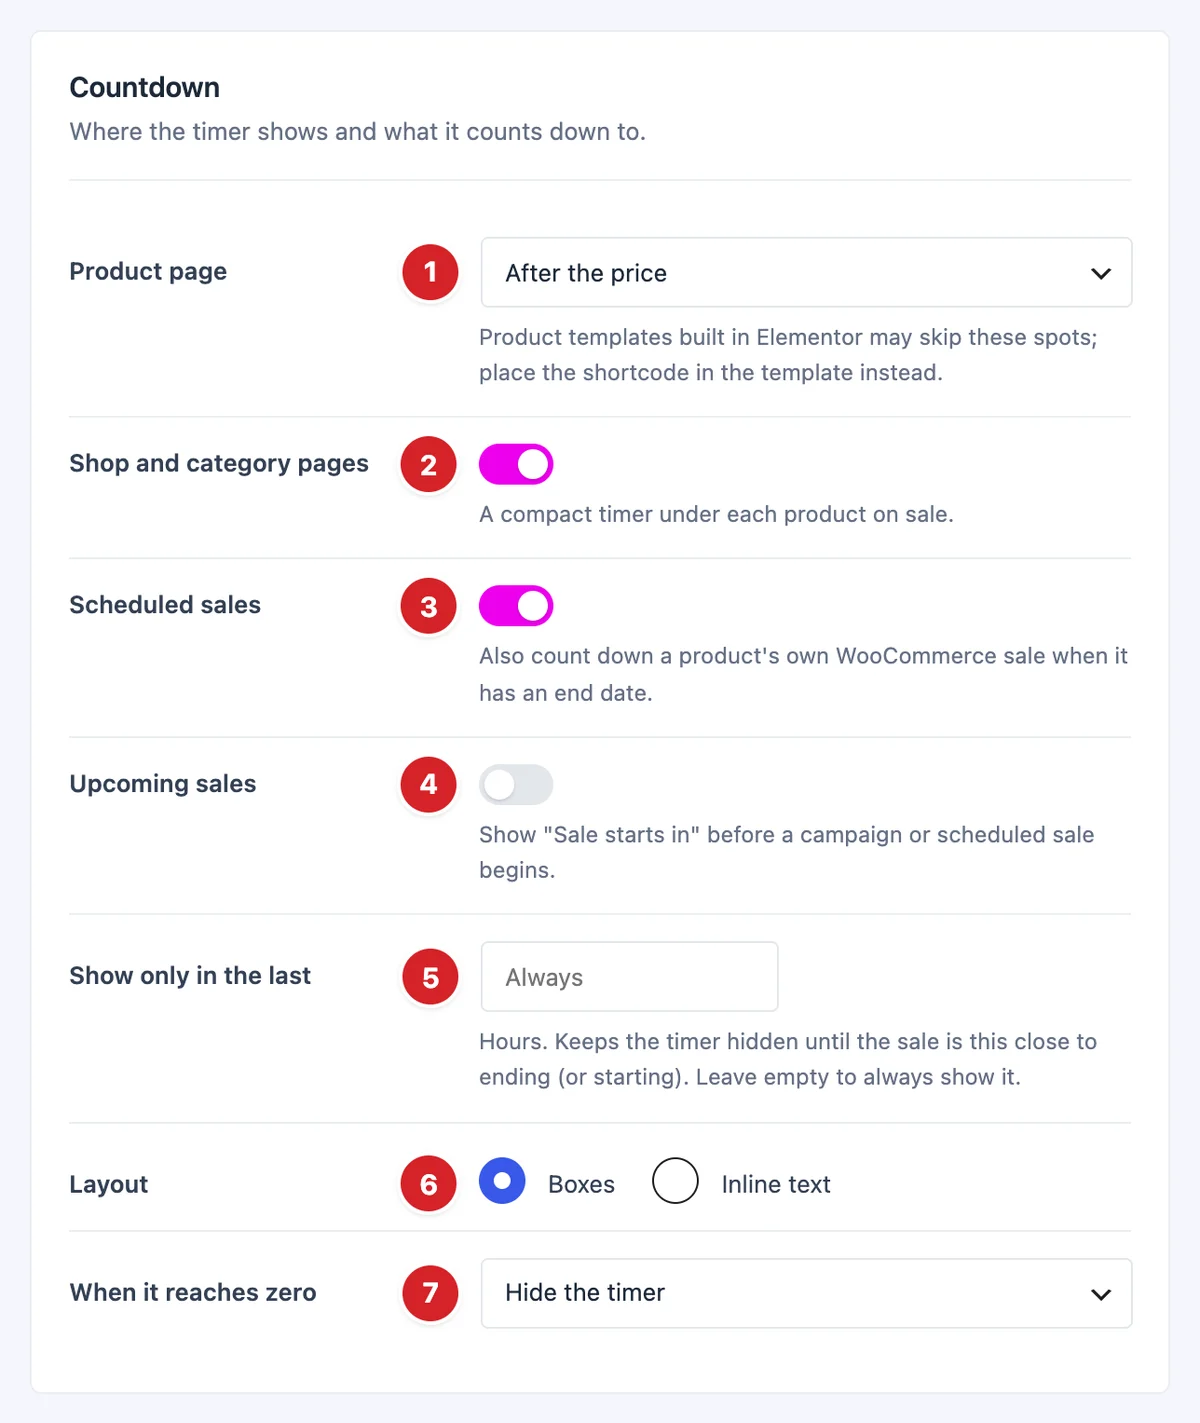
Product page: After the price (default), Before the add-to-cart form, After the add-to-cart form, After the short description, or Don't add it (use the shortcode).
- 2
Shop and category pages: On by default. A compact timer under each product, above its add-to-cart button.
- 3
Scheduled sales: On by default. Also counts down a product's own WooCommerce sale when it has an end date.
- 4
Upcoming sales: Off by default. Shows “Sale starts in” before a campaign or scheduled sale begins.
- 5
Show only in the last: Hours. Hides the timer until the sale is this close to ending or starting. Empty means always.
- 6
Layout: Boxes (default) or Inline text.
- 7
When it reaches zero: Hide the timer (default) or Reload the page once, so prices update.
Product templates built in Elementor may skip these positions. Place the timer with the shortcode instead.
Set Up the Progress Bar and Labels
The Progress bar card has three settings:
- Show a progress bar — on by default. Shows units sold when the campaign has a unit limit, otherwise stock left when the product tracks stock.
- With a unit limit — the bar text, by default
%sold% sold – only %left% left;%total%also works. - With stock only — by default
Only %stock% left;%sold%also works.
The Labels card sets the headings Before a sale ends (“Sale ends in”) and Before a sale starts (“Sale starts in”), and the Days, Hours, Minutes and Seconds labels. Click Save Flash Sale Countdown settings when you're done.
Place the Timer with the Shortcode
Add [atomel_flash_sale_countdown] to an Elementor product template or anywhere shortcodes work. Without id it uses the product being shown; id="123" picks a product. Optional: layout="inline" and progress="no". Set Product page to Don't add it (use the shortcode) so the timer doesn't show twice.
In the product editor, Product data → General shows a Flash sale note with the campaign that applies now and, for a capped campaign, how many flash units have sold.
Show the Timer in Product Widgets
The Atomic Addons Product Grid, Product Carousel, Product List, Product Slider, Product Accordion, Product Table, Product Image Accordion and Product Image Hotspot widgets show the timer under the price. Each has a Sale Countdown switch (on by default) right after its Price switch; in Product Grid and Product Carousel it is under Settings → Content.
Final Preview
 (Open the full-size image in a new tab)
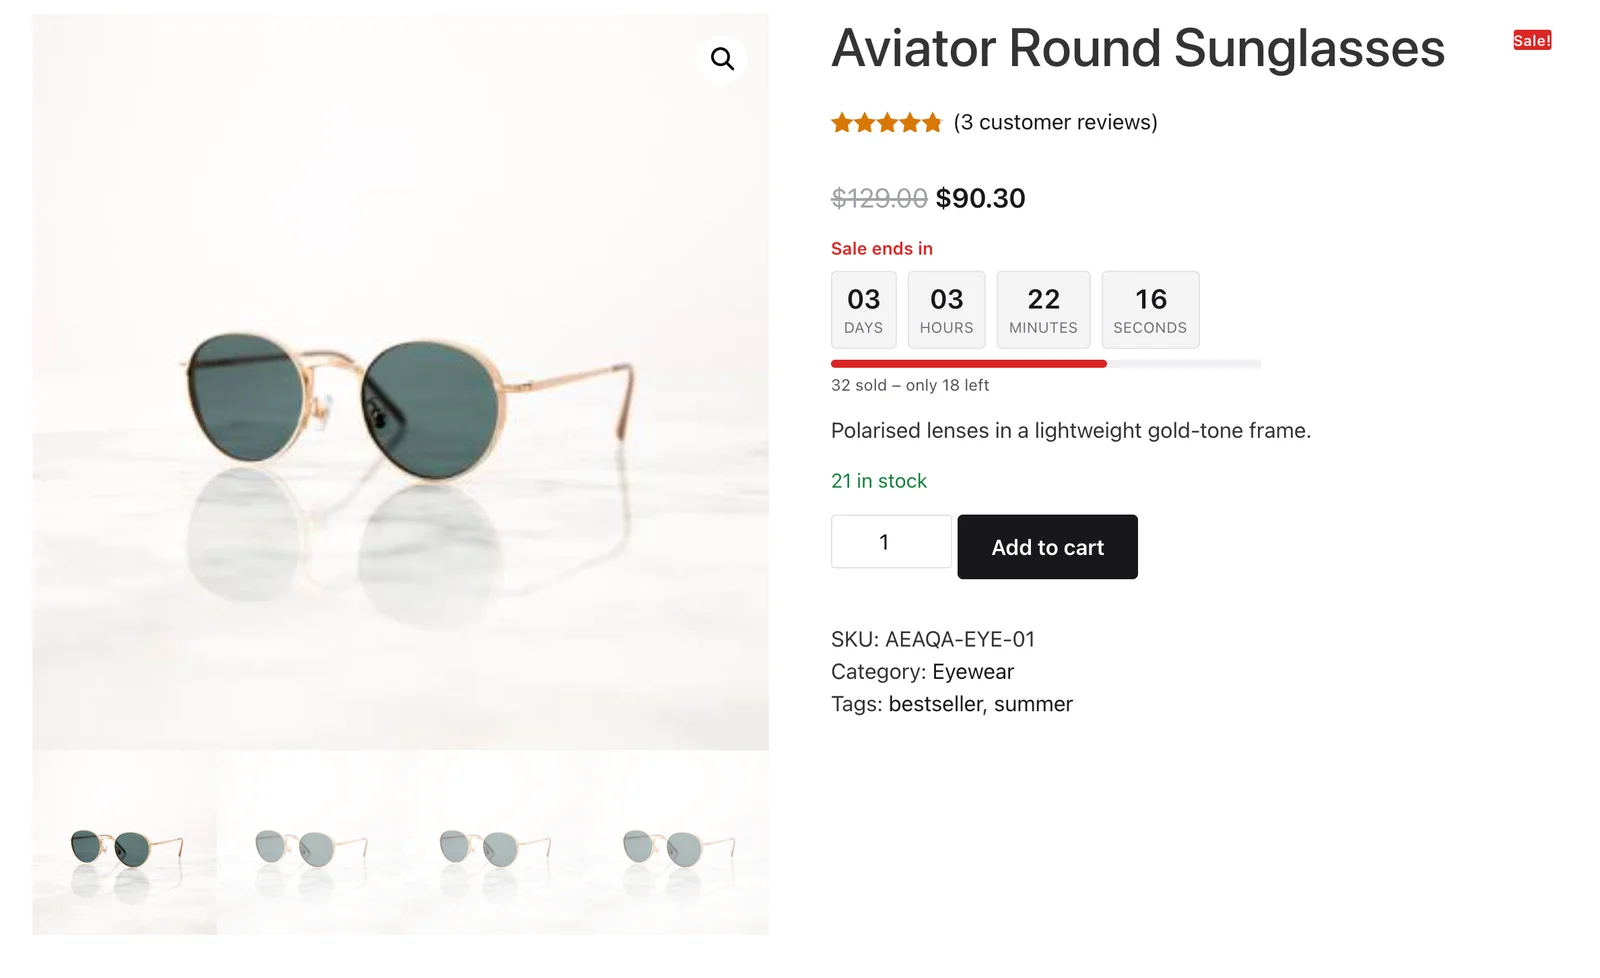
A product page during a 30% off campaign, with 32 of 50 flash units sold.
 (Open the full-size image in a new tab)
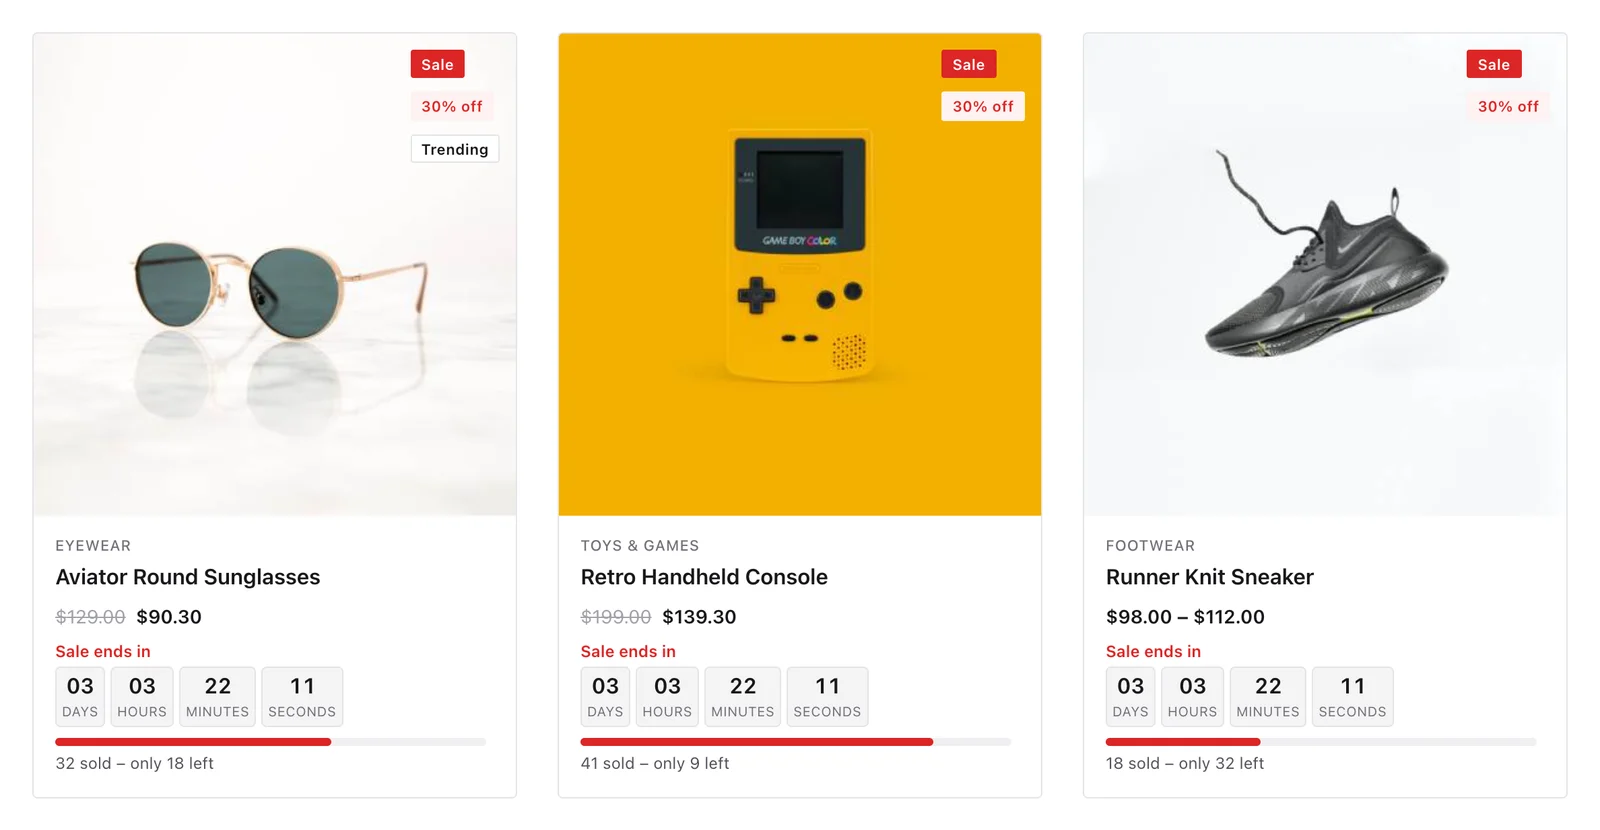
The same campaign in the Product Grid widget.
All done! You have successfully set up the Flash Sale Countdown extension on your store.
Thanks for being with us.
Can't find what you need?
Our support team can help with setup questions and anything the docs don't cover yet.